Mastering Email Deliverability for Crypto: The 3-Pillar SPF, DKIM, and DMARC Framework

Imagine spending hours crafting a personalized email campaign for high-value crypto leads—only to have most of your messages land in spam or be flagged as phishing attempts. It’s a gut punch, especially if you rely on email outreach to connect with potential token projects, investors, or fellow B2B partners in the blockchain space.
That’s why you need to master the 3-Pillar SPF, DKIM, and DMARC Framework. By properly setting up these authentication protocols, you prove to mailbox providers (and recipients) that you’re legitimate. In addition, once your deliverability and domain trust are established, utilize Crypto Email Marketing: Proven B2B Sequences for Web3 Deal to build chain‑specific email cadences that leverage those improved inbox placements and steadily turn opens into meetings and revenue. You also bolster deliverability, minimize spam flags, and protect your reputation from spoofers who try to impersonate your domain. In simple terms, if you want your cold outreach or marketing emails to be seen, you can’t skip this step. Additionally, avoid spammy words in your letters' texts.
Below, we’ll walk through the fundamentals of SPF, DKIM, and DMARC—why they matter, how to set them up, and how they work together to create a bulletproof sending reputation. By the end, you’ll have a step-by-step playbook tailored for crypto-savvy teams who want to ensure their email communication remains trusted and secure.
1. The High Stakes: Why Skipping Email Auth Is Risky
1.1 Persuasive Hook: The ROI of Trust
Bold POV Statement: Unsecured emails damage trust, and in crypto, trust is everything.
If your domain looks untrustworthy, you won’t just lose open rates—you risk tanking credibility in front of founders, investors, and fellow innovators. In a scam-averse industry like blockchain, even a hint of suspicious emailing can kill a potential partnership.
1.2 Quick Story: A Painful Experience
A small DeFi analytics startup learned this the hard way. They launched a cold outreach to potential clients—layered with data, references, and big promises. Yet their open rate hovered around 2%. Why so low? They had no valid SPF record, and the receiving email systems flagged them as “unverified.” Many emails never arrived in the primary inbox at all. After setting up basic SPF, DKIM, and DMARC, their deliverability soared above 90%, and open rates jumped to 18%. That difference was the pivot from a failing campaign to a pipeline that landed two serious leads worth $30K each.
1.3 Data Backs It Up
According to a benchmark analysis by various email providers, properly authenticated domains see up to 10%–15% better inbox placement on average. Plus, advanced DMARC policies (like p=quarantine or p=reject) can reduce fraudulent emails claiming to be from your domain by up to 80%. With crypto deals involving large sums and high-profile investors, you can’t afford not to protect your domain integrity.
2. Overview: The 3-Pillar Framework
Think of SPF, DKIM, and DMARC as the three pillars that hold up your email’s reputation. Each protocol tackles a specific angle of trust:
- SPF (Sender Policy Framework) – Verifies which IP addresses or mail servers are allowed to send on your behalf.
- DKIM (DomainKeys Identified Mail) – Digitally signs outgoing emails to confirm they haven’t been altered in transit.
- DMARC (Domain-based Message Authentication, Reporting & Conformance) – Ties SPF and DKIM together, allowing domain owners to specify how failing emails are handled (monitor, quarantine, or reject) and providing reports on suspicious activity.
Combined correctly, these three pillars convey to mailbox providers like Gmail, Outlook, ProtonMail, etc., that you’re who you claim to be. Let’s break them down step by step.
2.1 How to Check SPF, DKIM, and DMARC
One of the simplest ways to confirm whether your SPF, DKIM, and DMARC configurations are working is by sending a test email to another address you own. Here’s how:
- Open the email inbox you wish to test.
- Create a new message (any subject, any body text).
- Send it to a different email account of yours.
- In the receiving inbox, locate the message you just sent.
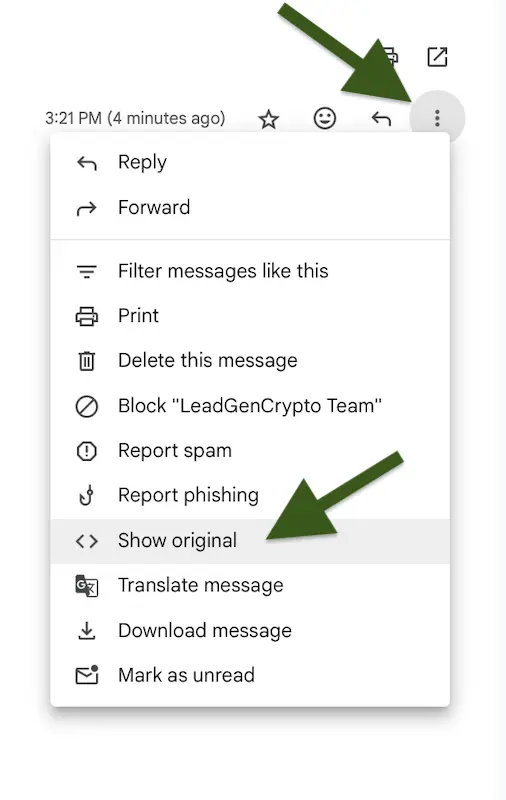
- Click the three dots in the top-right corner (screenshot below) and select “Show original.”

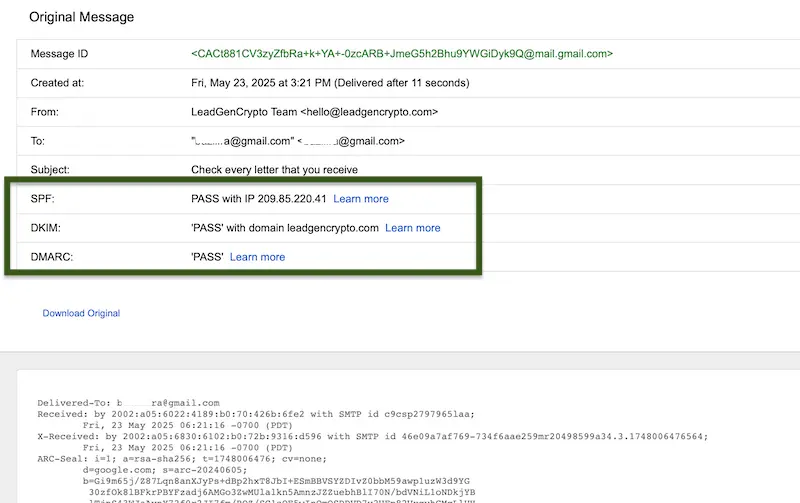
You will see a page displaying the SPF, DKIM, and DMARC results. If everything is correctly configured, you should see “PASS” for all three—just like in the image below.

If any of these elements shows “FAIL,” follow the instructions below to correct the configuration as quickly as possible.
3. SPF: Setting the Stage for Trust
3.1 What Is SPF?
SPF is basically a list of servers and IP addresses authorized to send emails using your domain. A receiving email server checks your domain’s DNS TXT record for an SPF entry. If the sending IP address is included, the message “passes” SPF. If not, it “fails,” and spam filters may block or flag the email.
3.2 Why Crypto Businesses Need SPF
Crypto is ripe with impersonators. Attackers may spoof your domain to scam potential token investors or run phishing campaigns. Implementing a strict SPF policy ensures only your approved email services or IPs can send under your domain name.
3.3 How to Set Up SPF (Step by Step)
-
Identify All Sending Sources
List every platform or service that sends emails on behalf of your domain. This might be your web host, CRM tool, marketing automation, or even specialized cold outreach services. -
Create an SPF Record
You’ll need to create a TXT record in your DNS. A typical SPF record starts withv=spf1followed by the authorized sending sources. For example:v=spf1 include:sendgrid.net include:mailgun.org -allinclude:sendgrid.netmeans you allow SendGrid to send email as your domain.-allis a directive stating that emails from servers not listed are rejected.
-
Publish the Record
Within your domain registrar or DNS management dashboard, add this TXT record. Many domain providers have a specific “SPF” record option. Just ensure it’s the correct text. -
Validate with an SPF Checker
Tools like MXToolbox or dmarcian can verify whether your new SPF record is correctly set up. They’ll also warn if you’re missing or duplicating anything.
3.4 Pro Tips & Common Pitfalls
- Avoid multiple SPF records. Having two separate SPF TXT entries can cause confusion. Merge them into a single record.
- Use ‘include:’ carefully. Some marketing tools chain SPF includes, potentially pushing you near the 10 DNS lookup limit. If you exceed it, your SPF can fail by default.
- Periodic review. If you add or remove email-sending services, update your SPF. Otherwise, you might inadvertently block your own mail or allow unwanted sources.
4. DKIM: Sealing the Deal with Digital Signatures
4.1 What Is DKIM?
DKIM attaches an encrypted signature to every outgoing message. The private key lives on your sending server, while the public key is published in your domain’s DNS. When the recipient’s server sees your DKIM signature, it checks your public DNS record to confirm the key matches. If it does, the email is considered legitimate and untampered.
4.2 Why DKIM Is Essential in Crypto
If your email is changed mid-transit—maybe a malicious actor adds a phishing link—DKIM can fail and alert the recipient’s filter. This is crucial for crypto marketing. You’re often sending sensitive invites to AMAs, pitch decks, or token sale info. Ensuring no one modifies your content en route keeps your message (and your brand) safe.
4.3 How to Set Up DKIM (Step by Step)
-
Generate Your DKIM Keys
Many email providers (like Google Workspace, Zoho, Mailgun, or SendGrid) automatically generate a pair of public/private keys for you. Locate this setting in your email service’s admin panel or domain authentication page. -
Publish Your Public Key
You’ll be given a “selector” (often a random or user-defined string, e.g.,googleorsmtpapi). Then you create a TXT record in DNS with a name like: google._domainkey.yourdomain.com
The content of this TXT record is your public DKIM key (a long string of letters, numbers, and symbols).
-
Enable DKIM Signing
Switch on DKIM for your domain in your email service. Each provider has a slightly different interface, but generally, you’ll see a toggle or button like “Enable DKIM.” -
Test Your DKIM Setup
Use a tool such as “MXToolbox DKIM Lookup” to confirm your record is valid. Then send a test email to a service like Mail-Tester, GlockApps, Litmus or Dmarcian to see if your DKIM signature passes.
4.4 Pro Tips & Common Pitfalls
- Selector naming: Each sending service might create a separate selector. Double-check you have the right DNS record for each provider if you use multiple email tools.
- Key rotation: For added security, rotate your DKIM keys periodically. This ensures a compromised private key can’t harm you indefinitely.
- Character limits: Some DNS providers have trouble with longer TXT entries. You may need to split the key into multiple segments if it’s too long.
5. DMARC: The Grand Conductor
5.1 What Is DMARC?
DMARC (Domain-based Message Authentication, Reporting & Conformance) is like the rules engine that sits on top of SPF and DKIM. It defines how receiving servers should treat emails that fail SPF or DKIM checks—whether to monitor them, quarantine them, or reject them outright. DMARC also provides valuable reports, so you can see which IPs are sending mail from your domain and whether they pass or fail authentication.
5.2 Why DMARC Is Critical for Crypto Organizations
In the cryptocurrency space, brand reputation is fragile. A single phishing attack can tarnish trust irreparably. DMARC ensures you have a firm policy in place. Furthermore, the EmailOctopus deliverability step‑by‑step guide for crypto projects helps turn these authentication principles into practical settings within EmailOctopus, ensuring your outreach lands in primary inboxes. If an email claiming to be from your domain fails authentication, it can be automatically quarantined or rejected, making it much harder for scammers to impersonate your brand. Also, to protect domain reputation as you scale, separate email from hosting and use a future‑proof VPS stack with TLS/HTTP‑3, WAF/CDN, daily backups, and below 30‑min restore SLOs.
5.3 How to Set Up DMARC (Step by Step)
- Start with a “None” Policy
If you’re new to DMARC, use a “none” (monitor) policy first. This will generate reports without affecting mail flow. For example:
v=DMARC1; p=none; rua=mailto:dmarc-reports@yourdomain.com; ruf=mailto:dmarc-forensics@yourdomain.comruais where aggregate reports are sent (daily summaries).rufis for forensic (detailed) reports if available.
-
Analyze Reports
Over a couple of weeks, analyze the incoming DMARC data. Look for any unauthorized IP addresses or servers. Ensure your legitimate sources pass SPF and DKIM consistently. -
Move to “Quarantine” or “Reject”
Once confident in your legitimate sending infrastructure, tighten your policy to quarantine or even reject. For example: -v=DMARC1; p=reject; rua=mailto:dmarc-reports@yourdomain.com; ruf=mailto:dmarc-forensics@yourdomain.com; adkim=s; aspf=sp=rejectmeans any failure is outright rejected.aspf=sandadkim=senforce “strict” alignment for SPF and DKIM.
-
Refine and Maintain
Keep reviewing DMARC reports. Occasionally, you may discover a new sending service that isn’t properly configured. Adjust your SPF/DKIM records to cover it, or remove unauthorized sources.
5.4 Pro Tips & Common Pitfalls
- Strict alignment: If your domain alignment is set to “relaxed,” some fail cases might slip through. For tighter security, opt for strict (
s) alignment for both DKIM and SPF. - Forwarding complexities: Email forwarding can sometimes break SPF alignment. DMARC often relies on DKIM alignment to pass in these cases.
- Report parsing: DMARC aggregate reports are XML-based. Use a third-party tool or service (e.g., Postmark’s DMARC tool, dmarcian, or DMARC Analyzer) to interpret them. Manual review is tedious but worthwhile for understanding your mail streams.
6. Micro-Case Study: From High Spam Rates to Rock-Solid Delivery
An NFT marketing agency emailing prospective clients on Solana noticed a dismal 4% open rate. They realized none of their outreach was passing SPF checks because they used a new domain with no email authentication configured. Worse, they’d never enabled DKIM in their CRM tool.
After implementing SPF by including their CRM’s sending IPs, generating and publishing a DKIM key, and rolling out a DMARC policy at “none,” they saw a jump to a 17% open rate within two weeks. Encouraged, they tightened the DMARC policy to “quarantine,” ultimately hitting an 80%+ deliverability rate. With consistent alignment across SPF, DKIM, and DMARC, they reclaimed the inbox—and signed three new clients.
7. FAQ & Common Questions
7.1 What if I use multiple email services?
Make sure you add each one to your SPF record (often via include:). Each service typically gives you a DKIM record to publish. You can have multiple DKIM selectors, one per service. DMARC is domain-based, so it applies regardless of the service—just confirm all your services are covered.
7.2 Do I really need DMARC if SPF and DKIM are set?
Yes, you do. DMARC closes loopholes by telling mailbox providers what to do with messages that fail SPF or DKIM. Without it, your domain can still be spoofed, and you won’t have aggregate or forensic reports to monitor suspicious activity.
7.3 Is a DMARC policy of ‘reject’ too harsh?
It can be if you haven’t tested your email flow. Start with “none,” fix any issues, then “quarantine,” and finally “reject” once you’re confident. A strict reject policy is the best defense against spoofing once everything’s stable.
7.4 Doesn’t it take a lot of time to maintain all these records?
Setting them up requires some diligence, but ongoing maintenance is minimal unless you’re constantly adding new mailing tools or subdomains. Periodic checks (every quarter or so) keep everything tight.
8. Integrating Everything: Putting SPF, DKIM, and DMARC in Place
8.1 The Step-by-Step Recap
- Add an SPF Record
- List authorized senders.
- Test with an SPF checker.
- Enable and Publish DKIM
- Generate keys with your email provider.
- Publish the public key in DNS.
- Verify your DKIM signature with a test email.
- Configure DMARC
- Start with p=none to monitor.
- Review reports and adjust.
- Move to quarantine or reject for stronger security.
- Monitor & Update
- Use DMARC reports to spot unauthorized senders.
- Update DNS if you add or remove sending platforms.
8.2 Mini-Checklist Before You Hit “Publish” (on Your DNS)
- Did You Merge All SPF Entries?
Make sure you have only one SPF record. - Are Your DKIM Records Active?
Double-check if your email provider sees them as valid. - Are You Receiving DMARC Reports?
Ensure you have a working mailbox for rua/ruf addresses. - Watch for Initial Errors
Use a tool like mail-tester .com to confirm your overall score.
9. Final Thoughts: Safeguard Your Crypto Brand and Reach the Inbox
For crypto-focused businesses (from marketing agencies to token issuers) every email can be a linchpin for forging deals or building crucial community ties. In an industry plagued by scams, establishing email trust isn’t optional. By implementing SPF, DKIM, and DMARC, you create a fortress of legitimacy around your domain, dramatically improving both deliverability and brand integrity. After that, you can warm-up emails to improve conversion rate.
Whether you’re sending a quick cold outreach or a detailed investor update, you want to ensure it lands where it should: in the recipient’s primary inbox, free from suspicion. Next, streamline the writing and follow‑up work with this hands‑on Google Workspace Duet AI guide for crypto sellers and shave your admin time down to 30 minutes a day. The 3-Pillar SPF, DKIM, and DMARC Framework is your blueprint to achieve exactly that. By following these steps, you’ll protect your reputation, reduce spam risk, and, most importantly, let your carefully crafted emails do what they’re meant to—open doors and spark valuable conversations in the crypto realm. Besides, use other useful suggestions for reaching token-based crypto projects to improve your sales.
